Showing posts with label recipe. Show all posts

Monday, May 5, 2014

It's the Time of the Season for...Coffee

Yesterday's temperature was in the 90's. It was glorious. My mom picked up the kids for a few hours and Husband and I made some cold soba noodles in peanut sauce and fresh rolls, and we had ourselves quite the romantic picnic at a park (I'm not saying there was wine...but there may have been wine). We threw the frisbee around while the sun was setting. When we came home, the kids got home shortly afterwards and we played Carcassonne, then played in the backyard with our pretty lights on the deck. It was really a spectacular evening. We slept with our windows open last night, ceiling fans going, and woke up to a perfect temperature in the house. I went out to feed the chickens in a t-shirt and maxi skirt and didn't even freeze. Ahhh, summertime.

For those of you who know, summertime brings about a special kind of coffee at our house that we try to always have on hand. Why? Make it and you'll know why.

This recipe is from Bon Appetit and is simple and delicious! I'd even say perfect.

The ingredients are simple (it helps to have a scale): 9 cups of water to 1/2 lb. of ground coffee beans.


I apologize for anyone who has already read this recipe from other blogs I've posted on...I just had to share here on MCA. It's a warm-weather favorite!

Vessel + coffee
First measure out the coffee. Tip: using a less-fine grind will be better for straining. Grinding the beans yourself works well, but buying ground coffee is fine, too. :)


Add 9 cups of water.

Husband is such a great hand model. He should be a professional.


After the water is added to the coffee, stir it all up and leave it alone!

Put on the lid and set it on the counter overnight. In the morning you will wake up to a glorious, caffeinated surprise!

(WARNING: This next part gets tricky at first...we ended up having a big mess to clean up on our first try. The mixture of coffee grounds and water is very...sloshy.)

Set a fine mesh strainer over a bowl and pour the contents of your container into it. This will strain out MOST of the grounds. Throw those grounds away (or put them on your plants or in your compost pile or make a hat...whatever you want to do, really) and pour the strained liquid into another container. Wash out the bowl you just used because you are going to use it again! Whee!

Don't stop here! Go to the next step! (Sorry, I know you're thirsty.)

Now you will put a coffee filter into the strainer. This part goes a little slower, but it is worth it if you want the smoothest brew, trust me. Slowly pour the once-strained liquid into the filter and let it drain. You will have to do this a bit at a time, as it will not all fit into the strainer at once. Your patience shall be rewarded.


Mmmmmmm

Throw out the filter and pour your fabulous new coffee into some sort of carafe. This one is supposed to be for orange juice, but now it is for coffee.

Hello, I'm Coffee Carafe. My OJ past is over; please don't bring it up.

Now for the part you've all been waiting for: IT'S DRINKING TIME! Here is what goes in my coffee:

Coffee, milk, and homemade vanilla syrup...in a stemless wine glass because I'm fancy like that.

We do 1/2 cup coffee and 1/2 cup milk (my husband uses almond milk), and a shot of syrup (we just eyeball this). 


And here it is, ladies and gentlemen, Iced Coffee. I drink mine sans ice cubes, but Husband prefers ice in his. Just a warning: this stuff is GOOD. You might go through it pretty fast. Don't say I didn't warn you! =)

Tuesday, March 18, 2014

A spring dessert (adapted to vegan)

Daylight savings makes such a difference! Even though we are still having sub-freezing temps on most days, just having the lightness stay later makes it feel as if spring is surely right around the bend.

We've been making some dietary changes in our house to deal with some health issues. We've eliminated all meat and dairy products (eggs too), except for fish and seafood. I have to say I feel much better and "lighter" and am looking forward to light, fresh meals especially as we head into the warmer months. 

I'm a huge fan of Daytona over at Outside Oslo. My husband is part Swedish and I love to add cultural dishes from our heritage into the weekly repertoire. Recently she posted a dessert recipe that made my mouth water, lemon riskrem with raspberries. Doesn't that just make you want to jump for joy with feelings of spring?!?

Her recipe is absolute perfection as is and I highly recommend it! Lemon-Scented Riskrem (Rice Cream) with Raspberry Sauce

I wanted to make it vegan though and came pretty close! So here is what I did....

Instead of using whole milk I used sweetened vanilla almond milk, which also meant I could skip the sugar and vanilla bean ( I was feeling a little lazy). 


For the whipped cream I used a can of full fat coconut milk and 2 Tablespoons of powdered sugar. It took a bit more whipping than dairy cream to form peaks but after several minutes in the kitchen aid it came together quite nicely. The coconut also adds a lovely flavor I think.


I used mixed berries instead of just raspberries because that's what I had.


At the end I ended up messing up and not letting the rice cool enough before adding in the cream which of course liquified my lovely coconut cream, stupid mistake but this is what happens when the baby is crying and there is chaos of boys and dog and cat etc. So my final dessert doesn't look as pretty as Daytona's but it tasted A-mazing!


I hope you'll try this whether you make the original version or my vegan adaptation. It's super lovely and kid/husband approved ;)

Enjoy that sunshine!!!

Saturday, February 8, 2014

Make Our Own Conversation Hearts? Ok, We'll Try It.

When I saw this pin on Pinterest: Homemade Conversation Hearts, I thought "Oh wow what I cute idea! The kids and I can make these!" NEVER AGAIN. The recipe itself is fine and the outcome is indeed very cute, but HOLY COW these were a lot more involved than we expected.

At first I thought it wasn't so bad. It started getting sort of frustrating when the flavorings and food coloring kept making the dough too sticky and we had to keep adding more and more powdered sugar. On the third of the four colors I was getting a little irked, but it was ok; the kids were being good sports and helping tremendously. It took three of us in latex gloves to accomplish this:

Hey, it's still pretty fun at this point!
One person for holding and kneading the dough (me), one for adding the coloring and flavors (Miss G), and one for adding the additional powdered sugar and also keeping the other colors from drying out (Miss S). Once we got the dough appropriately flavored and colored, then came the rolling out, cutting out, and placing on the parchment paper. The easy part! <--(I thought)

Miss G transferring some of the cut hearts to the parchment paper.

Ooh, pretty.

Candy lace


This recipe makes A LOT of candy hearts. And after you cut, push out each heart as it sticks inside the tiny cutter, transfer to the parchment paper, and cry out with your fist in the air to St. Valentine, you might find yourself feeling the same as I did while making these. 

These are almost all of the hearts that we got decorated. We were pretty much done.
Please direct your attention to the two obviously child-made ones. 


Perhaps you are looking for a zen-master trial for yourself...may I recommend making homemade conversation hearts? To be fair, I really have to hand it to Diamonds for Dessert. I think it's amazing that she created AND decorated all of hers. Even using a little stamp and everything. That's hardcore! Candy making is a delicate art and she is a candy artist. 

Also I might add that at this point we were on our second day of snow days + I was sick, so maybe my tolerance level was low for such time consuming and detailed tasks. 

Regardless, I'm glad that we tried these and (pretty much) completed them. So every heart doesn't have a message; it's really ok. We will put these out for our smorgastarta feast tonight. 

Now I'm off to make a sandwich cake with Husband and the Little Ladies. He has drawn up a design for the top of the cake of a wizard vs. dragon duel in a forest. Extreme!

Thursday, January 30, 2014

Coooookies

The gnome cookie jar, illuminated by the rays of the sun while awaiting
my offering of baked goodness.

I saw some cookies on Pinterest the other day, and if you follow me on there you probably saw them, too: Earl Grey Tea Cookies.

I'm not sure why, but I have been wanting to eat ALL THE COOKIES lately, so being that we had (pretty much) all of the ingredients on hand, I decided to make these bad boys. Ok, ok, they are tea cookies. Maybe "bad boys" is not the term I'm looking for. Anyway, we didn't have Earl Grey tea, so I just broke open a few cheap regular tea bags. I'm telling you, I wanted cookies badly. I had to make do with what we had and what we had was not fancy. 

~Hey wait a minute or four, speaking of bad boys, have you seen this?


Ok back to the post.~

So anyway, these are the result and they are pretty delicious. They sort of remind me of shortbread, but with a different flavor. A flavor of...tea...and oranges. 

Enlarged to show texture

That's a demitasse set - these are leetle cookies. That means you can eat a bunch.
Tiny little pucks of shortbready orange and tea deliciousness. Aww yeah. What cookies have you made recently?


Thursday, December 19, 2013

How's It Going?

Holiday preparations underway? Pretty busy? I hear ya. Yesterday I finished up Miss S and Miss G's Christmas presents (finally!) and I'm still working on a few more presents. Not to mention, the day after tomorrow we are having another feast - our annual Sweet Swap (Now with Bonus Potluck-Style Feast)! People bring enough of a homemade treat to share and at the end of the night everyone goes home with an array of sweets. You might have guessed we were having another feast if you've been following along at All Tomorrow's (Dinner) Parties!

In the last week we had Husband's graduation from university (that means a big party), kids' holiday and end of semester school events, holiday preparation, and we all had fun making and decorating cookies. If you haven't seen this, it's worth a look...we had a bunch of fun doing this to our cookies! So gorgeous and fun. Awesome Cookie Decorating Method from The Kitchn. Yes, it's as excellent as it looks.

We used my mom's simple icing recipe for the base and then colored icing for the embellishments.

Annaliese's Mom's Icing Recipe (Ready? It's Complicated)

1. Pour some powdered sugar in a bowl.
2. Add some drops of vanilla extract.
3. Add a little milk.
4. Mix until it's icing.
    4a. Too runny? Add a little more powdered sugar until it's right.
    4b. Too dry? Add a little more milk til it's right.
    4c. Too un-vanilla-y? Add a few more drops of vanilla.
5. Voila! Add food coloring, if you so choose.

I learned this recipe when I was, oh I don't know, three years old maybe. It's actually really good, and the factor of ease makes it quite delightful. I like the way it hardens on the cookie and everything looks smooth and beautiful.

The girls' main presents are a fox doll and a cat doll. They both have been asking for these for months and it's been difficult to keep it a surprise, but there's only less than a week to go now! Yay! Here are (Yet Unnamed) the Cat and Carrot the Fox, with masks, jackets, bows, and purses:

What do you think? Husband thinks the kids are going to flip out when they see them. I can't wait! ^_^

Sunday, December 8, 2013

Homemade Gifts - Do You Do Them?

Our family has decided to make the majority of the presents we give this year for the holidays. We would like to contribute to consumerism as little as possible and give people something special that we created ourselves. We're thinking of making baked goods, spice blends, and sewn items (to name a few). 

The spice blend idea is a pretty fun one that my culinary-genius Husband thought up. I got the recipes to share with you all! We used large jars to do the mixing, after which we will put in smaller jars for the presents. 


Herbs de Provence

2 parts dried savory
1 part dried basil
1 part dried oregano
1/2 part dried mint
1/2 part dried rosemary
1/2 part dried fennel
1/2 part salt
1 part dried lavender 

Put together and mix or shake!


Husband's (Not Exactly 5) 5 Spice Blend

7 or 8 anise pods
2 tsp dried fennel
1 tbsp Szechuan peppercorns
1 tbsp cloves
2 3" cinnamon sticks
1 tbsp ground allspice

Toast in pan over med-high heat until fragrant, then grind and add:

1/2 tbsp ground white pepper
1/2 tbsp Himalayan sea salt 

Check out this (hilarious + epic) slow-mo video of the toasting process, starring The Man Himself, my mister :


Are you making homemade gifts this year? I would love to hear your ideas, too! ^_^


Tuesday, November 5, 2013

If chicken soup is for the soul, what is curry soup for?


The heart. 

Curried soup is for the heart friends, it's soothing yet spicy, a combination that makes you feel happy, full, and gives a swift kick here and there! Which is how our hearts can feel; happy, full, and sometimes kicked around. 

So here's my recipe for curried squash soup ( please keep in mind I do not measure when I cook). 

Curried Squash Soup for the Heart

- coconut oil
- 1 butternut squash (peeled, seeded, cubed)
- 1 medium onion
- 5 cloves garlic
- approx 4 cups chicken ( or veggie) stock
- fresh ginger root (about 1 inch peeled and grated)
- green curry paste, heaping spoonful
- 1 can coconut milk
- 2 scallions, cilantro, red pepper ( all optional


Heat a couple tablespoons of oil in a soup pot, if you don't have coconut oil use olive oil or butter. I love cooking with coconut oil though ( plus it has so many other uses too.....best nighttime moisturizer ever!). 

Sauté your onion till translucent, add in minced garlic and cook about 1 minute. Add in squash and ginger and cook on medium heat stirring frequently. After about 5 minutes add in your stock. I use the crockpot method to make stock from our Sunday roast chicken, store bought is fine just make sure it's a good quality one without added yucky ingredients. 

At this point add in a heaping spoonful of curry paste (red curry paste would be fine too).

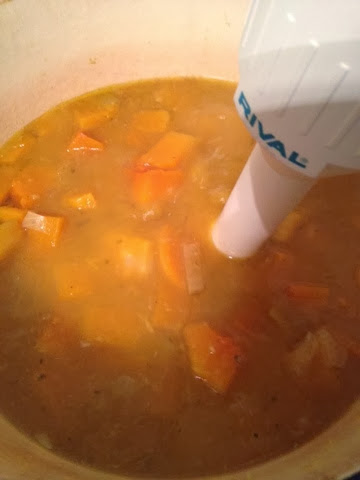
Salt and pepper to taste. Cover and simmer about 45 minutes or until squash is fork soft. Reduce heat to lowest setting and get out your immersion blender. Alternatively you can use a regular blender and blend in small batches, but do yourself a favor and invest in an immersion blender, $20 will save you lots of dishes!

Now it's time to add in the coconut milk, make sure you get all the creamy fat in there ( yes, please lick the spatula. It's good for ya and I won't tell). Stir until it's well blended. 
Add in your scallions, red pepper flakes, and garnish with cilantro. Serve, enjoy, and don't do any heart kickin' unless it's with this soup!

P.S. Don't worry I didn't forget about that old closet purge! Truth is our hearts are a bit worried around here as a loved one is having some setbacks after surgery. I'll return next Tuesday for some epic purgyness!